Can you put new polymeric sand over old?
Short answer
Not as a thin top-up. A skim of new polymeric sand over old, hardened joints tends to crack and flake, and Alliance Gator advises treating the job as a new install. On GTA interlock, clear the old material at least 1 to 1.5 inches (25–38 mm) deep, let the pavers dry completely, then refill, compact and wet the joints on a dry day above 0°C (5°C for some sands) with no rain for 24 hours.
Key numbers
- Old sand to clear out
- At least 1.5 in (38 mm)
- New sand finishes below chamfer
- At least 1/8 in (3 mm)
- Sand that drops on first compaction
- 30–50%
- Pressure washer for clearing
- 25-degree tip, at least 3,000 psi
- Weather while it cures
- Above 0°C (5°C for some sands), no rain for 24 hours
In this guide
Putting new polymeric sand over old rarely lasts. A thin skin of new sand on old, hardened sand has nothing solid to bind into, so it cracks and peels out of the joints. The fix that holds on GTA interlock is clearing the old joints out deep enough and refilling them like a new install, on a dry day above freezing.
That’s annoying when the joints have only dropped a bit, there’s half a bag of polymeric sand in the garage, and sweeping it over the top looks like a twenty-minute job. It’s still the part worth getting right.
If you’d rather hand it off, clearing and re-sanding joints is part of our polymeric sand and weed removal service.
Why can’t you put new polymeric sand over old?
A thin top layer has nothing to lock into. Polymeric sand is made to fill and bind the whole joint, and it doesn’t bond to a hard layer of old sand underneath.
Alliance Gator’s blog answers this exact question. Adding a thin layer on top of what’s there is “not ideal”, it says, because the original sand can be old, dirty or of unknown condition. Its advice is to remove at least 1 inch and follow the steps for a new install.
Its FAQ is blunter about a close cousin of the same habit: filling the lower part of a joint with regular sand and putting polymeric sand on top. Alliance Gator calls that “topping” and says it’s very bad to do. The joint surface peels and flakes off, and any warranty is void.
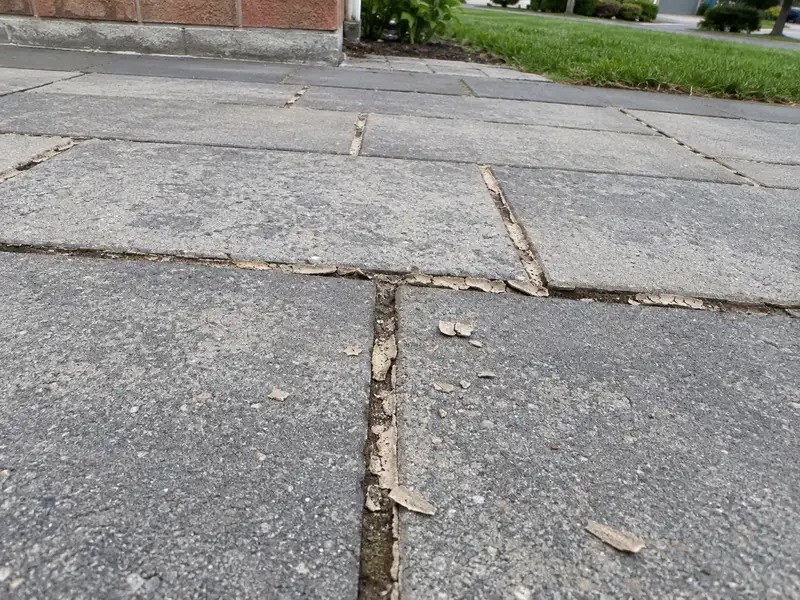
The reason, according to Alliance Gator, is that without a firm, densely packed joint underneath, water and ice work their way in and the material on top fails. It recommends filling the entire joint depth with its sand, and Sika’s data sheet says the same for its product.
Are your joints actually too low?
Check before you buy anything. Alliance Gator wants polymeric sand to finish at least 1/8 inch below the chamfer (the bevelled top edge of the paver), and 3/16 or even 1/4 inch below on wider joints. Joints sitting at that level are probably where they should be.
If they’ve dropped further, the sliver you’d add is far thinner than the 1.5-inch minimum joint depth Alliance Gator and Techniseal give for their sands. It won’t stay put through foot traffic, tires and a GTA winter.
How deep do you need to remove the old sand?
At least 1 inch, and 1.5 inches (about 38 mm) on most products. The manufacturers don’t all say it the same way:
Scroll sideways to see the whole table.
| Product | Clear old sand to | Fill level | Weather limits |
|---|---|---|---|
| Alliance Gator polymeric sands (FAQ, Supersand G2 page) | Minimum 1.5 in; its blog says at least 1 in | At least 1/8 in (3 mm) below the top or chamfer | Above 0°C; G2 sands rain safe 15 minutes after wetting |
| Techniseal RG+ (data sheet) | Minimum joint depth 4 cm (1.5 in); the sheet sends joint replacement jobs to its HP2 product | Bottom of the chamfer, or at least 3 mm (1/8 in) below the top | Above 0°C for the 48-hour drying period; plan for 24 hours without rain |
| Sika Evolution Pro (data sheet) | Full joint depth, or at least 38 mm (1.5 in), for touch-ups or reinstallation | About 3 mm (1/8 in) below the chamfer | Above 5°C for 48 hours; no rain for 24 hours (48 hours for joints over 13 mm) |
So the safe target is 1.5 inches unless your bag says otherwise. You don’t always have to dig every joint down to the base, though.
Alliance Gator’s blog says some old polymeric material may stay put under the pressure washer, and that in most cases it’s fine to leave it and fill the washed-out areas with new sand. Sika is stricter. Its sheet says to remove all the existing sand, to the full depth or at least 38 mm.
Good to know
Read the label before you buy sand for an existing driveway. The Techniseal RG+ sheet says to use its HP2 product for all joint replacement projects, which is easy to miss.
How do you get the old polymeric sand out?
A pressure washer does most of it. Alliance Gator’s blog calls a pressure washer the best way to remove existing jointing material and recommends a 25-degree tip on a machine of at least 3,000 psi. Packed, weedy joints may need a scraper or joint tool first to break up the crust.
The catch is the bedding sand under the pavers. Alliance Gator’s G2 instructions for an existing paver surface warn not to disturb it while you clear the joints.
Watch out
Hold the wand at an angle along the joint, not straight down into it, and stop once you’re past 1.5 inches. Washing out the bedding layer can leave pavers rocking, and new joints crack wherever pavers move.
Let it dry completely
Then comes the slow part. The pavers, the joints and the sand below all have to be completely dry before new sand goes in.
All three manufacturers above call for a dry surface, and Techniseal and Alliance Gator explain why: moisture activates the binder early, so it sticks to the paver surface and stains it. Alliance Gator adds that damp joints stop the sand sliding down and packing tight.
To check, push a small screwdriver into a few joints. If the sand comes up dark or clumps, wait.
Can you patch just a few joints?
Yes, if the damage is local and you treat each patched joint like a new one. Alliance Gator’s advice for moss-damaged joints is to pressure wash out the damaged sand where it comes out readily, let the area dry, then replace the missing sand and activate it per its directions.
Fill those joints the same way as a new install, down to where the washer stopped, rather than skimming the surface.
If most of the surface has bad joints, it’s usually less work in the end to clear and re-sand the whole area in one go. Our polymeric sand guide lists the signs that point to a full replacement.
When can you re-sand interlock in the GTA?
Late spring through September is the reliable window around Markham and the rest of the GTA. The sand needs dry pavers and above-freezing temperatures while it cures, and the shoulder seasons are cold at night more often than people expect.
Environment Canada’s 1981–2010 climate normals for the Buttonville station in Markham show it clearly:
Scroll sideways to see the whole table.
| Month | Average low | Nights at or below 0°C (avg.) |
|---|---|---|
| April | 1.2°C | 12.5 |
| May | 6.8°C | 1.5 |
| September | 9.9°C | 0.4 |
| October | 3.6°C | 7.0 |
| November | −1.1°C | 17.8 |
Re-sanding also takes longer than a fresh install because of the pressure washing. The pavers and joints have to dry out completely before the sand goes down. Then the new joints need their own dry stretch afterwards (48 hours above 0°C for Techniseal RG+).
In October that’s often hard to line up. Products with a 5°C minimum, like Sika’s, rule out more of spring and fall than the 0°C sands do.
What are the common mistakes when re-sanding?
Most failed re-sanding jobs come down to a short list:
- Sweeping new sand over joints that were cleared only half an inch or so.
- Putting sand down on pavers or joints that are still damp after pressure washing, so the binder sticks to the paver faces and stains them.
- Blasting out the bedding sand, so pavers sink or rock afterwards.
- Re-sanding over a section that’s already sinking. Fix the pavers first; our guide on why interlock sinks explains how.
- Skipping the plate compactor. Alliance Gator says 30–50% of the sand drops on the first pass, and joints left loose let water in and fail.
- Leaving dust on the paver faces before watering. Our guide to removing polymeric sand haze covers the cleanup if that happens.
- Starting in late October and getting a frost before the joints have dried.
The refill itself (sweeping, compacting, blowing off, showering in sections) works the same as on a new install. Our step-by-step polymeric sand guide walks through it.
When is it worth calling someone?
A small patio with loose, crumbling joints is a reasonable weekend job if you have patience for the drying. It gets harder when the joints are packed hard with old polymeric sand, the area is a full driveway, or some pavers have sunk.
Then the pressure washing turns into a long day, and the risk of washing out the bedding goes up.
We do this work across Markham and nearby, including Richmond Hill and Stouffville: clearing the old joints, fixing any low spots, then re-sanding. You can see what that looks like in our interlock restoration project, or read more on our polymeric sand service page.
For a free quote, call (437) 684-2535 or text us a photo of your joints.
Step by step
- Break up and wash out the old joints. Scrape out weeds and crust, then pressure wash along each joint with a 25-degree tip, holding the wand at an angle rather than straight down, to at least 1.5 inches (38 mm) deep.
- Leave the bedding sand alone. Stop once you're past 1.5 inches. Washing out the bedding sand under the pavers leaves them loose, and new joints crack wherever pavers move.
- Let everything dry completely. Wait until the pavers, the joints and the sand below are dry. Moisture sets off the binder early, stains the paver faces and stops the sand packing down.
- Sweep in new sand and compact it. Sweep sand into the joints, run a plate compactor over the surface, then refill and compact again. Alliance Gator says 30–50% of the sand drops on the first pass.
- Finish below the chamfer and clean off the dust. Leave the sand about 1/8 inch (3 mm) below the bevelled top edge of the pavers, then sweep and blow every bit of dust off the paver faces.
- Wet the joints on a dry day. Water the joints as the bag directs, on a day above 0°C (5°C for some sands), and give them 24 hours without rain.
Other questions people ask
Can you put polymeric sand over regular joint sand?
Not as a top layer. Alliance Gator says filling part of a joint with regular sand and putting polymeric sand on top is very bad to do: the surface peels and flakes off, and any warranty is void. Sika also says not to partially fill joints with any other material. Clear the old sand at least 1.5 inches deep, ideally the full depth, let everything dry, then install the polymeric sand as if it were a new job.
How often do you need to add sand to pavers?
It depends on what's in the joints. Unilock notes that regular paver sand may need more frequent top-ups than polymeric, especially on wide joints or slopes. Alliance Gator says its polymeric sand can last 15 years when the pavers and the sand were installed properly and the surface is kept clean. When polymeric joints do fail, the fix is clearing and refilling them, not adding more sand on top.
What is the downside to polymeric sand?
It's fussier than plain sand. It needs dry pavers and a dry spell above freezing while it cures, and any dust left on the surface before watering sets into a white haze. It also can't be topped up the way regular sand can, so failed joints have to be cleared out first. Most polymeric sands, including Techniseal RG+ and Sika Evolution Pro, are only for pavers laid on a sand bed. Pavers over a concrete slab need a product made for it, such as Alliance Gator's Gator Maxx G2.
What is a cheaper alternative to polymeric sand?
Regular jointing sand. Unilock describes it as the cost-effective option next to polymeric sand, and repairs are easier because pavers lift out cleanly and new sand blends in. The trade-off is upkeep. Unilock says it may need more frequent top-ups and is more prone to washout, weeds and ants. A joint sand stabilizing sealer over it helps, according to Unilock.
Sources
- Alliance Gator: Gator jointing material FAQ
- Alliance Gator: 15 questions we get asked all the time
- Alliance Gator: Gator Supersand G2 product page
- Techniseal: RG+ Polymeric Sand technical data sheet
- Sika Canada: Evolution Pro Polymeric Sand product data sheet
- Unilock: Polymeric sand guide
- Environment and Climate Change Canada: Canadian Climate Normals 1981–2010, Toronto Buttonville A
Related guides and service
- How to apply polymeric sand (and the mistakes that ruin it) To apply polymeric sand on Ontario interlock, clear the joints at least 1.5 inches (4 cm) deep, wait until the pavers are fully dry, sweep the sand in, compact it with a plate compactor, leave it 1/8 inch (3 mm) below…
- Polymeric sand: what it is, when to replace it, and what affects the cost Polymeric sand is joint sand mixed with a binder that hardens as it dries, locking interlock pavers together and resisting weeds, ants and washout.
- How to remove polymeric sand haze from pavers Polymeric sand haze is sand dust and binder that set on the face of the pavers.
- Sunken interlock: why pavers sink and how to fix them Interlock sinks when the layer under it settles: a base that was too thin or poorly compacted, water soaking in from a downspout, or soft soil.